
SIX STEPS ON HOW TO DECORATE A GRADUATION CAP!
March 18, 2019
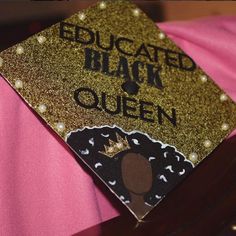
I know most people are used to the traditional cap for graduation with the very bland school color cap and little string thingy on the side (I think it’s called a tassel), but now you can forget about all that because I’m about to show you six steps on how to make a bomb graduation cap. You will need the following supplies: the cap of course, hot glue, a lot of glitter, paint, paint brushes, stencil, little rhinestones, and construction paper.
Keep in mind you don’t have to do the design I’m showing but this is just to you an idea.
The first step is that you should cut out a piece of construction paper the shape of you cap and glue it down make sure not to go overboard with the glue.
Step two apply a generous amount of glue onto of the construction paper and lightly shake a good amount of glitter on top of the cap until completely covered.
Step three after your glitter has completely dried and isn’t going anywhere, grab some more construction paper and stencil in your words that will go on top of your cap and cut them out and glue them very easy, very simple.
Step four you will now glue your rhinestones to the border of your cap (make sure the glue dries all the way before moving on, so they won’t fall off).
Step five you will now get your paint and your brushes and paint on your character at the bottom corner of your cap make sure to outline your character before painting so it will look nice and neat.
Finally, step six let your cap dry overnight and rock on your graduation day!